|
|
Setting up a harddrive for your Amiga
This guide has not been written specifically for the users of emulators, but for everybody using Amigas, no matter if virtual or real. That is why references to the hardware mechanics are sparse or non-existent. If you have trouble with the basic usage of the UAE emulator, check out the respective guide of either UAE or WinUAE.
What this guide will teach you is how to install Workbench 3.1 on a harddrive and set up a few useful tools like WHDLoad. What you need is an Amiga running Kickstart 3.1, the faster, the better. An A1200 is fine.
Finally, one word of caution: following this guide will erase anything currently on your harddrive (if you're using an emulator, it won't wipe your actual hd, of course, just the subdirectory you've set on the emulator). It is indeed only meant for people starting from the scratch.
Installing Workbench: Workbench 3.1 consists of six floppy disks. They're labelled 'Workbench', 'Install', 'Locale', 'Extras', 'Storage' and 'Fonts'. Turn your Amiga off and insert 'Install' into DF0:. If you have more drives, you can insert any of the other disks into them already. Turn the computer on.
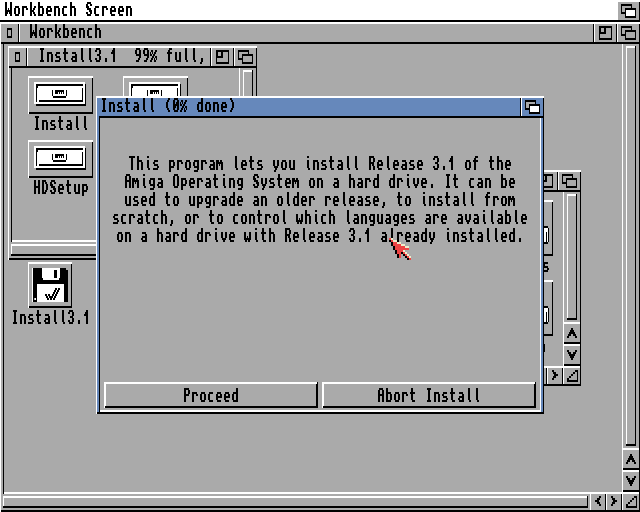
Wait a little, and you should see the standard Workbench desktop. If you need to, you can partition your harddrive with the 'HDSetup' tool. We'll skip this part for the benefit of non-technical users of emulators, though. Double-click on 'Install3.1', then on 'Install' and choose your language. For this guide, we chose English.
The next questions are fairly straightforward. Proceed with the installation until you're encounter this screen.
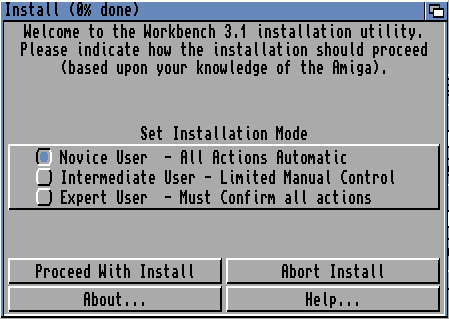
Choose 'Novice' for the easiest method. That means most questions won't even be asked, but the installer will use the default choices. On the next screen, you can choose additional languages to install. We keep English only (but that shouldn't stop you from choosing additional ones). The same goes for the printers dialog. If you have one, choose it.
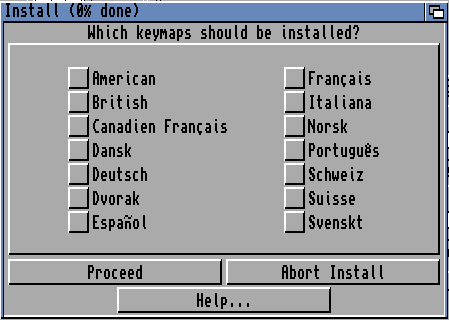
Next, you have to choose your 'Keymap'. That's the type of keyboard you have. Depending on your country, some keys are usually arranged a little differently. You can choose more than one if you're unsure which is the correct one.
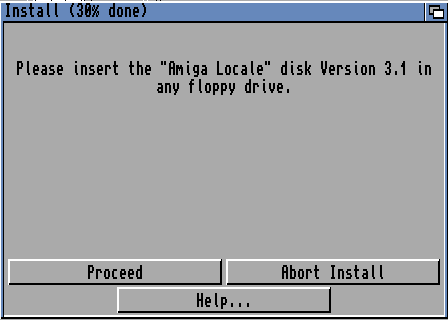
If your harddrive has been partitioned correctly, the Installer will now start copying files. Just wait and watch. At some point sooner or later, you will have to insert another disk.
Depending on which disks you had inserted at the very beginning, it might ask for a different disk than the one on the screenshot, of course. Once you followed the request of the installer, it should continue copying files. You don't even need to click 'Proceed'. You'll probably be asked to insert other disks a few more times. Just follow the requests of the installer. You can observe how far you've come in the window's title bar.
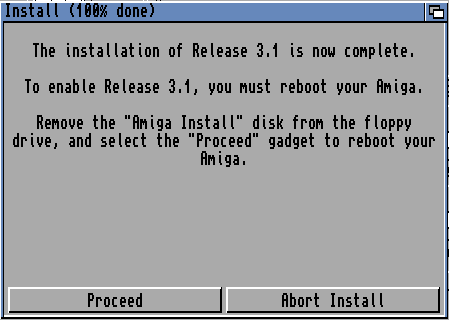
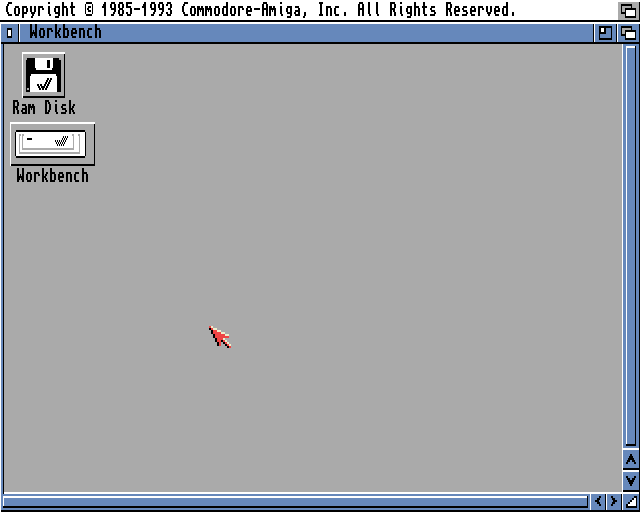
If everything went right, this is what you'll see next. The window exactly tells you what to do next: remove all floppies from the drives and click 'Proceed'. Your Amiga will reboot. It should now boot from your harddrive, and you'll get to the following screen.
Congratulations! You've put the first step behind you. You can now already install any game which comes with its own installer. More about that later on. First, let's install some more useful programs, though.
Installing LHA Archiver: Sooner or later, you'll have to extract archives you downloaded from the net. LHA is by far the most dominant one in the Amiga world.
Now is the time to introduce you to the most important website for everything related to the Amiga: AmiNet. Go there and search for lha.run (if you only search for lha, you'll get billions of results). Download the file and put it in C: (that's Workbench:C/; note to the emulation users: that's not the PC drive C:, but a subdirectory called C of the directory you used as your virtual Amiga hd).
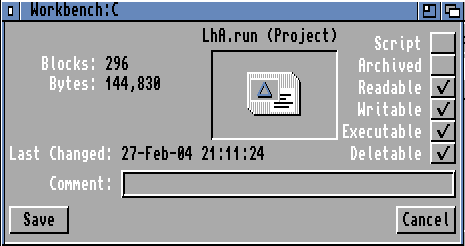
To be able to use it, double-click on the Workbench icon on your desktop. Click and hold the right mouse button and choose 'Window' - 'Show' - 'All Files' from the menu. Double-click on C and look for the LhA.run icon. Click on it once, then enter the menu with the right mouse button again. Choose 'Icons' - 'Information'.
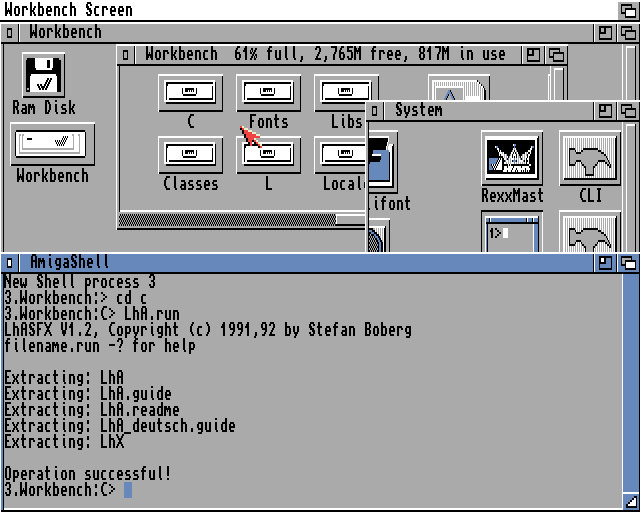
Check the 'Executable' box and then 'Save'. Close the C drawer again. In the Workbench window, open 'System' and then 'Shell'. Type the commands as shown on the screenshot.
LHA is now operational.
Installing the installer: This may sound strange at first. The installer is a program commonly used by many programs for their harddrive installation (like Microsoft's InstallShield). Search for installer-43 on AmiNet and download the package to your Workbench's root directory. In the Shell, run
- cd /
- LhA x Installer-43_3.lha
In your Workbench drawer, you'll now find the new drawer of the Installer. If you can't find it, choose 'Window' - 'Update' from the menu. Open the new drawer, and also the C drawer (you might need to choose 'Window' - 'Show' - 'All Files' on the Workbench window to see it). Drag the Installer icon from the Installer window over to the C window (again, show all files). Close both these windows.
Setting up WHDLoad: Many Amiga games can by default only be played from floppies. That can get fussy, and the loading times are the best. This is where WHDLoad comes in. It's a tool to install many games which normally don't support this feature to a harddrive. As a nice side-effect, games are usually also patched for AGA-compatibility, to run with faster CPUs and the copy protection is removed this way.
You can download the latest WHDLoad client from their website. The package you need is 'WHDLoad_usr.lha'. Download it to the root directory of your (virtual) harddrive.
In the Shell, type the following commands:
- cd /
- LhA x WHDLoad_usr.lha
The output should conclude with 'Operation successful'. If it doesn't, check back with the spelling. Capitalization is important. After successfully extracting the archive, you can now close the Shell.
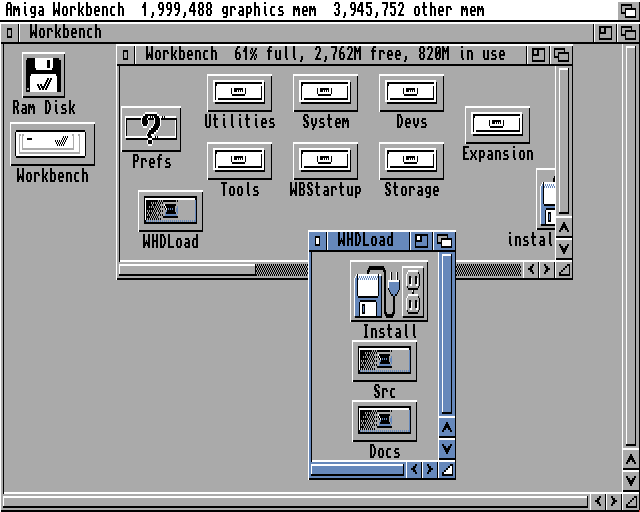
You should now see a WHDLoad drawer in the Workbench window. If you can't find it, choose 'Window' - 'Update' from the menu. Now open the WHDLoad drawer by double-clicking on it.
Start the installation with the self-titled icon.
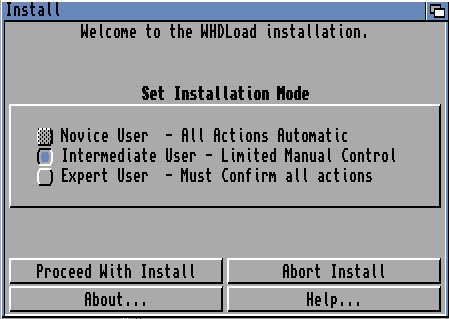
'Novice' isn't available this time, so we'll choose 'Intermediate'. Proceed and immediately proceed again ('install for real' should be chosen). WHDLoad will now ask where it should install itself to.
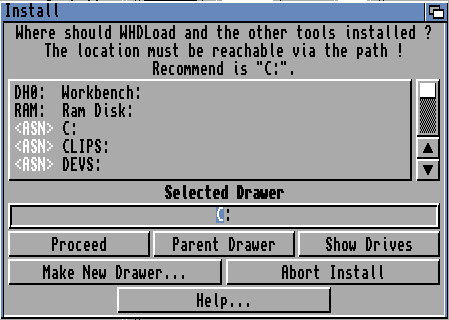
The default is C:. This is a very good choice, so we'll keep it and proceed. Something will be copied, and then, WHDLoad will ask where to install the documentation to. Keep the default here, too. You won't need the documentation anyway. More files will be copied. Eventually, a success message will appear. WHDLoad is now set up.
Installing Kickstarts: Many WHDLoad games will need software Kickstart versions to be located on the harddrive if the game needs another one than 3.1 natively. So we'll also install a fitting package. Search for skick345 on AmiNet, download the archive to DEVS: and extract it on the usual way (see above for explanation of the command line syntax). You'll now have a new drawer called Kickstarts in DEVS:. Please note that these are just the accompanying free files. The actual Kickstarts are still missing. As usual, you can get them with the Amiga Forever Package (or read them from real Amigas, of course).
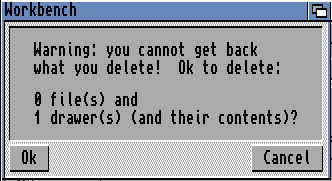
Cleaning up: You can now delete all the archives you downloaded (LhA.run, Installer-43_3.lha, WHDLoad_usr.lha and skick345.lha) previously, as well as the drawers of WHDLoad, Installer. To delete something, click on its icon once, and choose 'Icons' - 'Delete'. You'll be asked if you're sure. You are.
Installing Games: Now that we've prepared everything, this is quite easy. If you want to install a game, boot your Amiga from your harddrive, i.e. without any floppies in the drives. When it's done booting, insert the game disks. Double-click on the disk icon and then on the install icon. Everything which follows now is basically the same you already did before when following this guide.
Installing Games with WHDLoad: What if the game disk is labelled 'NDOS' or if there simply isn't an installation program? That's what we installed WHDLoad for. Go to their website and choose 'Installs' on top. Look for the game you want to install. Not listed? Well, that's bad luck. All you can do is try requesting an installer of this game to be made. Several people are actively developing installers for more and more games, so you might be lucky.
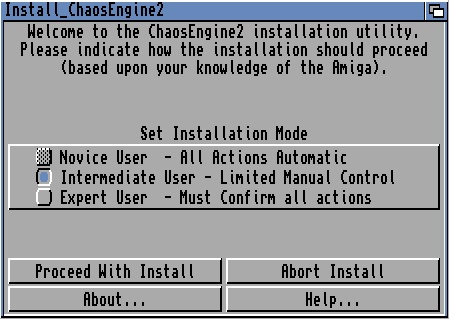
A huge number of games is already covered by the database. So let's assume you've found an installer for your game. Download it, extract the archive (just like you did so many times already), open the new drawer and choose 'Install'. As an example, we'll use Chaos Engine 2. Why this game? Because the loading times from floppies are unbearable!
The familiar installer comes up. Choose 'Intermediate' and 'Install for Real'. The Readme file comes up. It'll tell you how much memory you need and which cheat keys it implements. Close the Readme file.
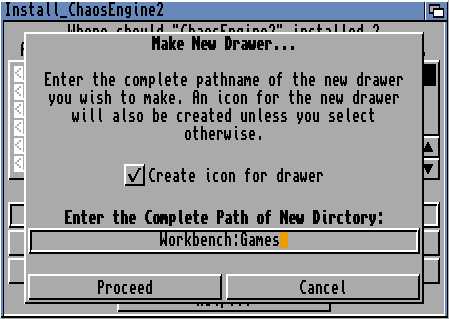
Next, the installer asks where to install the game to. You could, of course accept the default (which is Workbench:), but if you plan to install more games, it would be better to have a Games drawer on the Workbench: partition (note that if you also created a 'Work:' partition as the partitioning tool suggests, you should probably just install to that one instead of Workbench:). So we choose 'Make New Drawer'.
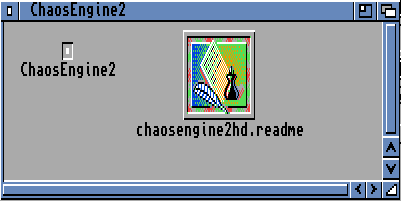
Enter 'Games' after Workbench:, just like on the screenshot and proceed. You're back at the dialog to choose a directory. Workbench:Games should now be chosen. That's correct, so we proceed. As next question, WHDLoad will ask whether you want to install teh ECS or AGA version of the game. This particular installer supports both. Choose the one which your disk set fits. Which icon you choose on the next screen is a purely cosmetic choice, so do whatever you like. The rest is again simple. A few files will be copied, you'll be prompted for the game disks. Insert them into DF0: (this installer only supports one drive, others might support more). If you do just that, you'll quickly have the game installed. You can now remove all floppies from the drives and delete the 'ChaosEngine2' drawer from which you launched the installation. Open the Games drawer, then ChaosEngine2 and run the game. Enjoy!
WHDLoad Troubleshooting: WHDLoad installers are written to work with original disks and Amigas. If you're using a cracked copy you downloaded from the net, it might work, but also might not. If original disks aren't available to you, try different cracked versions - one might work eventually. Don't blame the developers if you can't get it to run, though, please. Also, if you're using emulation instead of a real computer, make sure you don't increase 'drive speed' and choose any other 'unreal' settings.
More Things to Install: Here is a list of programs you might or might not find useful if you want to continue using your new harddrive:
- unzip - tool to extract the popular .zip format
- LZX - popular and very powerful archiver
- MiraWizARC - a GUI for all kinds of archives
- MUI - libraries needed by many other programs (like MiraWizARC)
You should by now be able to install them by yourself. Try it out!
Settings to try out: Check out the 'Prefs' drawer on your Workbench. You'll find everything important there. The first thing you might want to try is setting another screenmode. More colours, another resolution. Whatever you can think of. Explore it yourself, you can't do much wrong (apart from frying your monitor ;).
Trouble? Questions?
Post in the forum.
|